
Irresistibly Crunchy Sticky Sesame Cauliflower Wings Recipe

Sticky Sesame Cauliflower Wings. The very mention of this dish evokes a world of crunchy, savory goodness that brings plant-based dining to a new level. Imagine biting into golden, crispy cauliflower, coated in a sweet, salty sesame glaze that dances on your taste buds, promising pure flavor bliss with every bite. There’s something deeply satisfying about whipping up these Sticky Sesame Cauliflower Wings at home. They make the perfect appetizer for game nights, a fantastic side dish for your favorite Asian-inspired mains, or even a snack while binging on your favorite shows. The aroma wafting through your kitchen will have even the most dedicated carnivores asking for a taste! Ingredients for Sticky Sesame Cauliflower Wings Here’s what you’ll need to make this delicious Sticky Sesame Cauliflower Wings: 1 head Cauliflower – The star of the show. Look for a firm head with tightly packed florets for the best result. 1 cup All-Purpose Flour – This creates a crispy coating; you can use gluten-free flour if needed. 1 cup Water – To create a batter; it’s all about the right consistency. 1 teaspoon Garlic Powder – A must for flavor; use fresh garlic if you prefer a stronger kick. 1 teaspoon Salt – Essential to enhance the flavors of all the ingredients. 1 teaspoon Black Pepper – Adds a bit of heat; feel free to adjust according to your taste. 1/4 cup Soy Sauce – This salty component gives depth to the sauce; tamari can be used as a gluten-free option. 1/4 cup Maple Syrup – For sweetness and a glossy finish, it pairs perfectly with the soy sauce. 2 tablespoons Sesame Oil – This fragrant oil adds a lovely nutty aroma that’s hard to resist. 1 tablespoon Rice Vinegar – A splash of tanginess that balances the sweetness of the maple syrup. 1 tablespoon Sesame Seeds – For garnish; they add a delightful crunch and visual appeal. 1 teaspoon Ginger – Freshly grated ginger will work wonders for that extra zing. 1 clove Garlic – Minced; it boosts the garlic flavor in the sauce. How to Make Sticky Sesame Cauliflower Wings Follow these simple steps to prepare this delicious Sticky Sesame Cauliflower Wings: Step 1: Preheat the Oven Preheat your oven to 425°F (220°C) so it’s nice and hot when you’re ready to bake your wings. This temperature will help create that beautiful crispiness we all crave. Step 2: Make the Batter In a bowl, whisk together the all-purpose flour, water, garlic powder, salt, and black pepper until you have a smooth batter. This is what will help our cauliflower become crunchy on the outside! Step 3: Coat the Cauliflower Dip each cauliflower floret into the batter, ensuring it’s fully coated. Place the battered florets on a baking sheet lined with parchment paper to prevent sticking. Step 4: Bake the Wings Bake in the oven for approximately 30 minutes or until the cauliflower turns golden brown and gets crispy. Be sure to flip them halfway through to achieve an even crunch on all sides. Step 5: Prepare the Sauce While the wings are baking, combine soy sauce, maple syrup, sesame oil, rice vinegar, ginger, and minced garlic in a saucepan. Heat over medium until it starts to simmer, letting those flavors meld beautifully. Step 6: Toss and Garnish Once your cauliflower wings are baked, take them out of the oven and toss them in the warm sesame sauce. Sprinkle with sesame seeds for that final touch before serving. When you plate these Sticky Sesame Cauliflower Wings, impress both your friends and family by drizzling a little extra sauce over the top and maybe even a handful of chopped green onions for color. The combination of crunch and flavor is simply irresistible! Enjoy your culinary creation as an appetizer or a main course. Serve alongside some rice or a crispy salad, and watch them disappear faster than you can say “sticky sesame!” This showstopping Sticky Sesame Cauliflower Wings delivers restaurant-quality results using simple ingredients you probably already have at home. The perfect balance of textures and flavors creates an unforgettable dining experience that will have everyone asking for seconds. Picture-perfect presentation with vibrant colors makes this dish absolutely Instagram-worthy and guaranteed to impress any dinner guest. Incredibly versatile recipe that works beautifully for weeknight dinners, meal prep, special occasions, or even outdoor entertaining sessions. Perfecting Sticky Sesame Cauliflower Wings Cooking Process Start by preparing your batter while the oven preheats. Dip the cauliflower in your batter, bake until crispy, and then toss it in the sauce. This sequence ensures each step flows seamlessly, delivering crispy wings every time. Add Your Touch to Sticky Sesame Cauliflower Wings Consider adding a pinch of cayenne for heat or swapping maple syrup for honey if you’re aiming for a different sweetness. You can also sprinkle in chopped green onions for added freshness—there’s room to make this dish your own! Storing & Reheating Sticky Sesame Cauliflower Wings To store, place the cauliflower wings in an airtight container in the fridge for up to three days. To reheat, pop them in the oven at 350°F until crispy again, avoiding the microwave for sogginess. Family and friends can’t stop raving about these Sticky Sesame Cauliflower Wings. One time, I brought them to a potluck, and they were gone before I could grab a plate for myself—definitely a sign of a winning recipe! FAQs About Sticky Sesame Cauliflower Wings What are Sticky Sesame Cauliflower Wings? Sticky Sesame Cauliflower Wings are a delicious, plant-based alternative to traditional chicken wings. Made from cauliflower florets that are coated in a batter, baked until crispy, and then tossed in a sweet and savory sesame sauce, these wings pack a punch of flavor. With the right balance of spices and a glossy finish from the sauce, they are the perfect appetizer or snack for any occasion. Whether you’re hosting a game day party or simply indulging in a personal treat, these wings are sure to satisfy your cravings. How do I make Sticky
Delicious Homemade Garlic Herb Bread Recipe in Under 45 Minutes
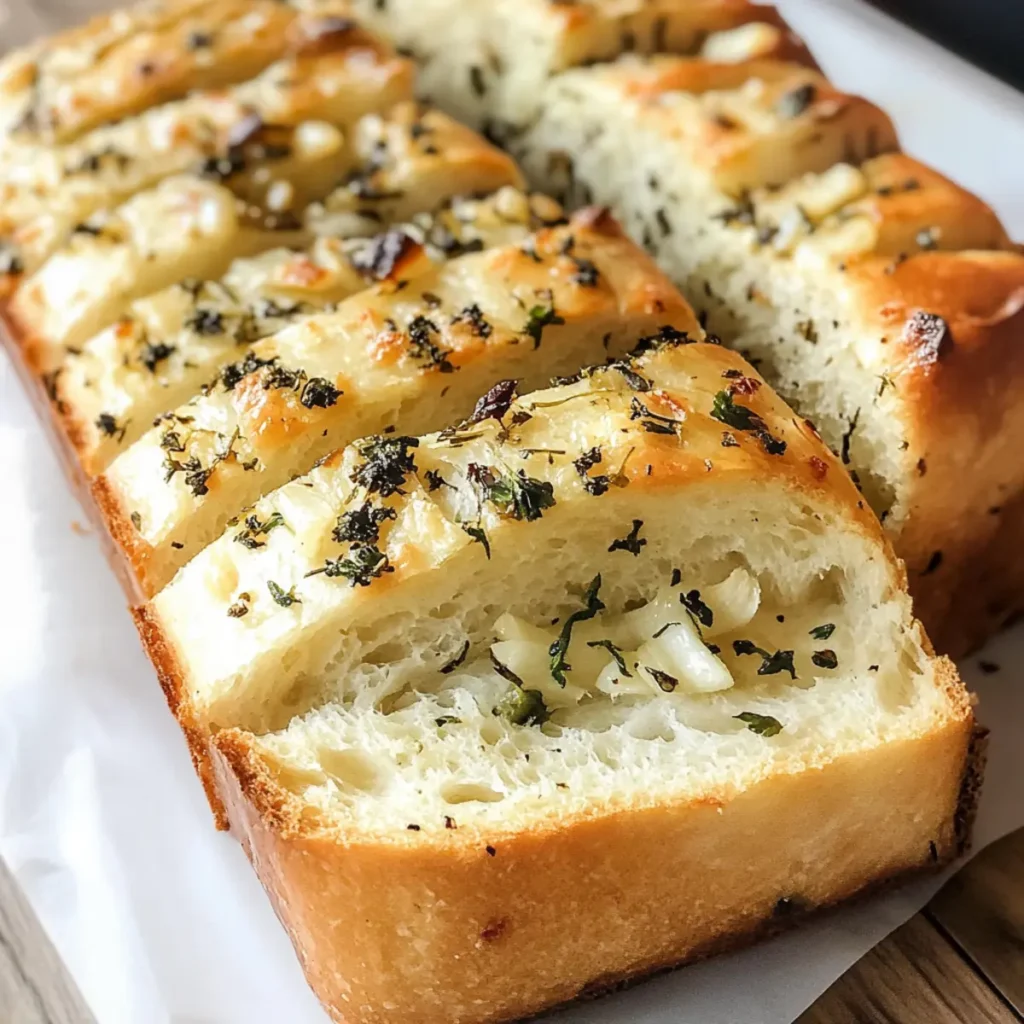
Garlic Herb Bread is pure magic in loaf form. Imagine pulling a warm loaf out of the oven, the aroma of freshly baked bread mingling with the savory scent of garlic and herbs—it’s a symphony of flavors that hits you right in the heart. Each bite of this fluffy, golden delight is a comforting embrace, warming your soul as if your grandma herself whipped it up, even if you’re the one in the kitchen. Picture this: It’s a chilly evening, and your friends swing by for a casual dinner. You pull out your Garlic Herb Bread, and suddenly, it’s the star of the show. The texture is just right—crispy on the outside, chewy on the inside—and the flavor? Let’s just say you might want to make two loaves because this bread disappears faster than you can say, “Who wants seconds?” Ingredients for Garlic Herb Bread Here’s what you’ll need to make this delicious Garlic Herb Bread: 3 cups All-purpose flour – The foundation of your bread; ensures a fluffy loaf. Avoid using cake flour; you want the elasticity of all-purpose. 1 cup Warm water – Activates the yeast; it should feel like a warm hug, not hot enough to scald you. 2 teaspoons Active dry yeast – The magical ingredient that helps your bread rise beautifully. Make sure it’s fresh; old yeast can be a buzzkill. 2 tablespoons Olive oil – Adds moisture and delicious flavor; feel free to experiment with flavored olive oils for a twist. 1 teaspoon Sugar – Just a pinch gives the yeast something to feast on, helping it work its rising magic. 1 teaspoon Salt – Enhances flavor while controlling yeast activity; don’t skip it—it’s a flavor powerhouse. 4 cloves Fresh garlic (minced) – The star flavor that takes this bread from ordinary to “wow.” Fresh is best for maximum impact. 2 tablespoons Mixed herbs (e.g., parsley, rosemary) – Adds that fresh, aromatic punch; use any blend you love. 1/4 cup Butter (melted) – For brushing on top; it gives your loaf a beautiful shine and irresistible flavor. How to Make Garlic Herb Bread Follow these simple steps to prepare this delicious Garlic Herb Bread: Step 1: Activate the Yeast In a bowl, combine the warm water, active dry yeast, and sugar. Stir gently and let it sit for about 5 minutes until it becomes frothy. This is where the magic begins, so be patient! Step 2: Mix the Dry Ingredients In a large mixing bowl, combine the all-purpose flour and salt. Make a well in the center, like a cozy little pool, where you will eventually mix in the wet ingredients. Step 3: Combine and Knead Pour the yeast mixture into the well, adding the olive oil, minced garlic, and mixed herbs. Stir until a dough begins to form. Transfer the dough onto a floured surface and knead for about 10 minutes until it feels smooth and elastic; this is a great workout for your arms! Step 4: First Rise Place the dough in a greased bowl, cover it with a damp cloth, and let it rise in a warm place for 1 hour or until it has doubled in size. This is the time to catch up on your favorite show or brew a nice cup of tea. Step 5: Shape the Dough Once risen, punch down the dough (let out all that pent-up energy) and shape it into a loaf. Place it in a greased loaf pan, ensuring it fits snugly. Step 6: Second Rise and Bake Brush the top with melted butter, cover with a cloth, and let it rise for another 30 minutes. Preheat your oven to 375°F (190°C). When the dough has risen again, bake for 30 minutes or until golden brown. The aroma will be incredible! Let your Garlic Herb Bread cool for a few minutes before slicing. Serve it warm with butter or as an amazing side for soups and salads. Everyone will be asking for your secret recipe and, trust me, you’ll want to keep it a mystery for a little longer! Garlic Herb Bread is not just a recipe; it’s an experience, a memory maker, and a marvelous gateway to cozy evenings and happy gatherings. Whether you pair it with a hearty stew or simply indulge in its garlicky goodness, it’s bound to become a favorite in your home. Enjoy every crumb! Perfecting Garlic Herb Bread Cooking Process To achieve the best results with Garlic Herb Bread, start by preparing your dough while your yeast activates. Once the dough rises, preheat your oven and shape the loaf, ensuring that everything flows seamlessly for a perfect bake. Add Your Touch to Garlic Herb Bread Get creative with your Garlic Herb Bread by swapping in your favorite herbs, like thyme or basil, or adding cheese like mozzarella for extra richness. You can even sprinkle some crushed red pepper flakes for a spicy kick. Storing & Reheating Garlic Herb Bread To store your Garlic Herb Bread, wrap it tightly in plastic wrap or foil to keep it fresh. Reheat in the oven at 350°F for about 10 minutes to restore its lovely crustiness. It’s funny how my kitchen has become the unofficial neighborhood hangout since I started making Garlic Herb Bread. Friends drop by, eyes wide with excitement, even if I just have a loaf ready and a bit of butter on the table. FAQs About Garlic Herb Bread What is Garlic Herb Bread? Garlic Herb Bread is a delicious, homemade bread that combines fragrant garlic with a mix of herbs, creating a savory flavor. This bread is perfect for serving alongside pasta, soups, or as a delightful appetizer on its own. With a crispy crust and a soft, fluffy interior, it’s a crowd-pleaser that you can whip up in under 45 minutes. The combination of fresh garlic, herbs, and butter makes this bread a flavorful addition to any meal. How can I customize my Garlic Herb Bread? You can easily customize your Garlic Herb Bread by
Mastering Classic White Bread: Easy Recipe for Beginners to Try
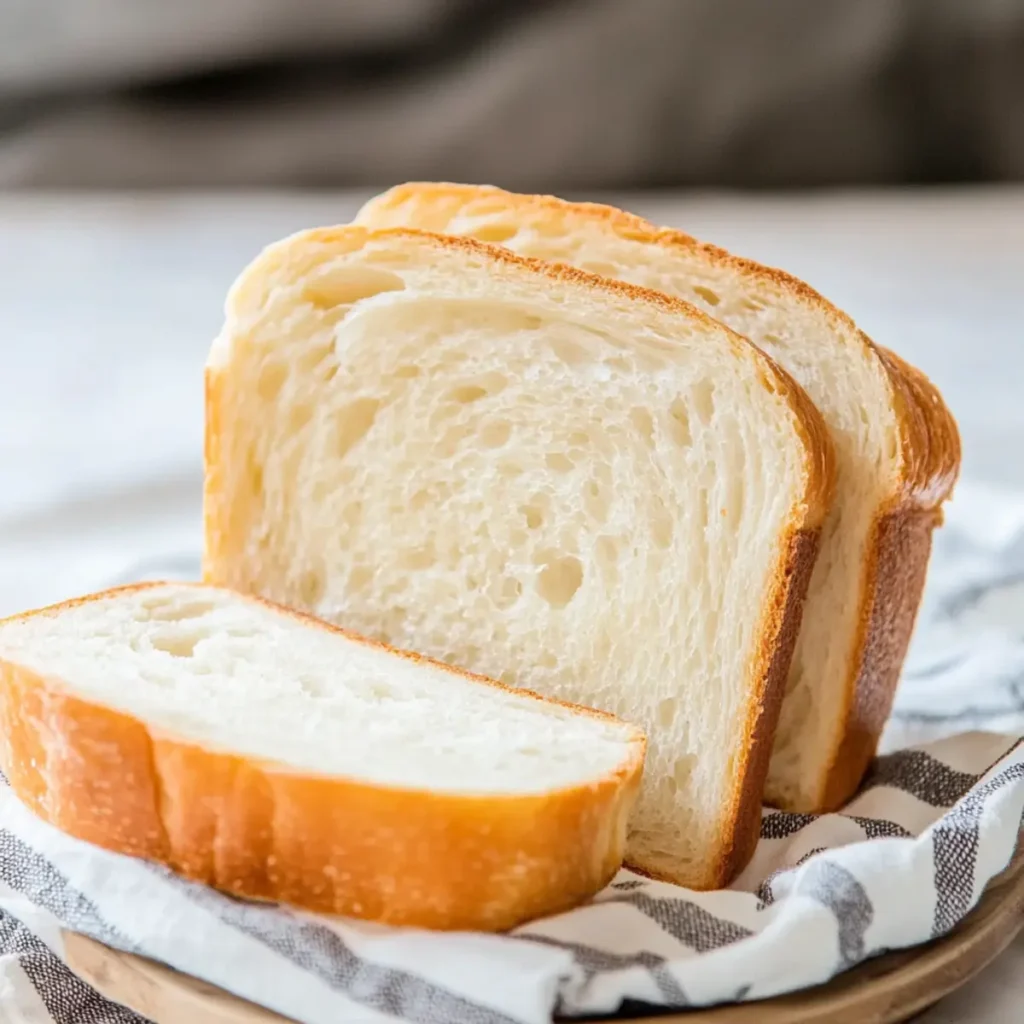
The aroma of freshly baked bread is enough to make anyone weak in the knees—just imagine that warm, comforting scent wafting through your home, wrapping you in a cozy embrace. Mastering Classic White Bread: Easy Recipe for Beginners is your ticket to unlocking that blissful experience right in your own kitchen. Whether you’re planning a family brunch or just want to treat yourself to some homemade goodness, this recipe transforms simple ingredients into an experience that feels almost magical. Biting into a slice of soft, fluffy bread, with its golden crust and warm insides, is like tasting a piece of home. Maybe it brings back memories of grandma’s kitchen, the gentle chatter of family gathering around the table, or that signature spread of butter melting into the warm surface. Perfect for sandwiches, slathered with jam, or simply enjoyed plain, this classic white bread is versatile enough to win over any crowd. Ingredients for Mastering Classic White Bread: Easy Recipe for Beginners Here’s what you’ll need to make this delicious Mastering Classic White Bread: Easy Recipe for Beginners: 3 cups bread flour – This essential ingredient creates the structure of your bread, giving it that perfect chew and softness. Look for high-quality flour for the best results. 1 package (0.25oz) Platinum Yeast (or 2 1/4 teaspoons) – Yeast is the magic behind the rise. Using Platinum Yeast ensures extra leavening power, making your bread both airy and soft. 2 tablespoons granulated sugar – This helps to activate the yeast, giving your bread a subtle sweetness that balances beautifully with savory toppings. 1 teaspoon fine salt – A crucial ingredient for flavor, salt also controls yeast activity, ensuring your bread doesn’t over-rise and fall flat. 1 cup warm water (120-130˚F, not too hot to touch) – Water activates the yeast, so it’s vital to get the temperature just right. Too hot and you’ll kill the yeast; too cool, and it won’t activate properly. 2 tablespoons canola or vegetable oil – The oil adds moisture and richness to the bread, making every slice soft and delicious. How to Make Mastering Classic White Bread: Easy Recipe for Beginners Follow these simple steps to prepare this delicious Mastering Classic White Bread: Easy Recipe for Beginners: Step 1: Mixing the Magic In the bowl of your stand mixer, combine 1 cup of bread flour, the yeast, sugar, and salt. Mix them together well. Then, add the warm water and oil to the mixture. Using the paddle attachment, beat it on medium speed for about 3 minutes. This step helps activate the yeast and builds a flavorful foundation for your dough. Step 2: Dough Development Switch to the dough hook attachment. Gradually stir in the remaining flour until you have a soft dough. Knead this dough on medium speed for about 5 to 7 minutes until smooth and elastic. You’ll know it’s ready when it stretches without breaking—just like trying to explain how you forgot to take the bread out of the oven! Step 3: First Rise Place the dough in a lightly oiled bowl, turning it to coat the top lightly with oil. Cover the bowl with a clean kitchen towel and let it rise in a warm spot until it has doubled in size, about 45-60 minutes. You’ll be amazed at how much this dough grows—kind of like your optimism after a good cup of coffee! Step 4: Shaping the Loaf Once the dough has risen, punch it down gently to release air bubbles. Turn it out onto a lightly floured surface and roll or pat it into a 14×7-inch rectangle. Starting from the shorter side, roll it up tightly, pressing the dough into a roll as you go. Pinch the edges and ends to seal the loaf nicely. Place it seam-side down in a greased 9×5-inch loaf pan. Cover it again and let it rise until an indentation remains after gently touching the dough, which should take about 30-45 minutes. Step 5: Baking Time Preheat your oven to 375°F (190°C). When ready, bake the loaf for 30-40 minutes or until the crust turns a lovely golden brown. You’ll know your bread is ready when it makes a hollow sound when tapped on the bottom—just like your stomach does when it’s ready for a sandwich! Step 6: Cooling and Slicing Once baked, carefully remove the bread from the pan and allow it to cool on a wire rack. This prevents the bottom from getting soggy and gives the crust a chance to firm up beautifully. Once cooled, slice it up, and enjoy! There you have it—Mastering Classic White Bread: Easy Recipe for Beginners. Serve it up as a centerpiece for your next meal or as a delightful vehicle for your favorite spreads and toppings. The possibilities are endless, and each slice brings you closer to a successful baking adventure! Perfecting Mastering Classic White Bread: Easy Recipe for Beginners Cooking Process To ensure the best results when mastering classic white bread, start by mixing your dry ingredients together before adding liquids. Kneading the dough thoroughly prepares it for rising, which gives it that airy, fluffy texture we all love. Add Your Touch to Mastering Classic White Bread: Easy Recipe for Beginners Make this recipe your own by swapping in whole wheat flour for a nuttier flavor or incorporating herbs like rosemary or garlic powder for a twist. You could also try adding seeds like sesame or poppy for extra crunch. Storing & Reheating Mastering Classic White Bread: Easy Recipe for Beginners To keep your bread fresh, store it in a cool, dry place in a breadbox or wrapped in a clean kitchen towel. Reheat slices in the toaster or a warm oven for a delightful, crunchy crust. When I first tried making classic white bread, the look of pure joy on my family’s faces as they sampled my warm, freshly baked loaves was priceless. That delicious aroma filled our home, creating a cozy atmosphere that felt just right. FAQs About Mastering Classic White Bread: Easy
Crispy Red Lentil Crackers Recipe: Healthy and Easy Snack

Crispy Red Lentil Crackers offer a delicious crunch that will transform your snacking experience. Imagine biting into a light, crispy cracker with a nutty flavor and satisfying texture that pairs perfectly with your favorite dip or spreads. There’s something special about watching your friends munch away at a platter of homemade snacks while you sip tea and feel like a culinary superstar. These crackers are not just a tasty treat; they’re an invitation to enjoy good food with good company, ideal for casual gatherings or quiet nights in. Ingredients for Crispy Red Lentil Crackers Here’s what you’ll need to make this delicious Crispy Red Lentil Crackers: ⅔ cup dry red lentils – Soaked until tender; they provide a lovely base and wonderful crunch when baked. ½ cup mix of seeds – Sunflower or pumpkin seeds add delightful texture and flavor. Feel free to experiment with your favorites. 1 teaspoon baking powder – This little ingredient works wonders by making the crackers rise a bit for that satisfying crunch. ½ teaspoon sea salt – Enhances flavors and brings out the natural nuttiness of the seeds and lentils. ¾ cup fresh water – Necessary for blending the ingredients into a smooth mixture; be careful, though—a little extra hydration could also be helpful during mixing! How to Make Crispy Red Lentil Crackers Follow these simple steps to prepare this delicious Crispy Red Lentil Crackers: Step 1: Soak the Lentils Begin by soaking the red lentils in water for about two hours. This step is critical because it allows the lentils to soften, paving the way for an irresistible crunch later. Step 2: Preheat the Oven Set your oven to 350°F (175°C). This will ensure your crackers have the perfect baking environment right from the start. Step 3: Combine Ingredients In a large mixing bowl, combine the soaked lentils, selected seeds, baking powder, sea salt, and fresh water. Blend everything together until you achieve a smooth, homogenous mixture. You can use a food processor for ease, or get your mixing arm working if you’re feeling strong! Step 4: Spread the Mixture Spread the mixture evenly on a baking sheet lined with parchment paper. Aim for an even layer, making sure it’s neither too thick nor too thin; about a quarter-inch works well. Step 5: Bake Until Crispy Place the baking sheet in your preheated oven and bake for 45 minutes. Keep an eye on it towards the end to ensure you achieve that perfect golden-brown hue. Step 6: Cool and Break Once baked, remove the crackers from the oven and allow them to cool for a few minutes before breaking them into pieces. Enjoy these delightful treats with your favorite dips or simply on their own for a healthy, satisfying snack! Perfecting Crispy Red Lentil Crackers Cooking Process Start by soaking the red lentils for several hours, allowing them to become tender. Preheat your oven while blending the soaked lentils with seeds and seasonings, ensuring an even mixture before spreading it onto the baking sheet. Add Your Touch to Crispy Red Lentil Crackers Feel free to get creative by adding herbs like rosemary or spices such as paprika. You could even incorporate grated cheese or nutritional yeast for a savory twist if you like a cheesy flavor. Storing & Reheating Crispy Red Lentil Crackers Store your crispy red lentil crackers in an airtight container to keep them fresh. If they become a bit soft, reheat them in the oven for a few minutes to regain their crunchiness. Making these crispy red lentil crackers reminded me of a lovely afternoon spent with friends, who raved about the crunchiness and flavor. Their delighted smiles made every minute spent in the kitchen worthwhile. FAQs About Crispy Red Lentil Crackers What are Crispy Red Lentil Crackers? Crispy Red Lentil Crackers are a delicious, healthy snack made primarily from soaked red lentils, mixed with seeds, baking powder, and sea salt. The result is a crunchy, savory treat that not only satisfies your craving for snacks but also packs in nutrition. These crackers are gluten-free and rich in protein, making them an excellent choice for anyone looking to maintain a healthy lifestyle. They’re incredibly easy to make at home and can be enjoyed on their own, with dips, or alongside your favorite cheese platter. How do I make Crispy Red Lentil Crackers? Making Crispy Red Lentil Crackers involves a few simple steps. Start by soaking red lentils for several hours to achieve tenderness. Preheat your oven, then blend the soaked lentils with your choice of seeds, baking powder, and salt. Spread the mixture evenly on a baking sheet and bake until crispy. The whole process takes about 50 minutes, including cooking time, and results in delightful, homemade crackers that are both nutritious and satisfying. Can I customize my Crispy Red Lentil Crackers? Absolutely! One of the great things about making your Crispy Red Lentil Crackers is how versatile the recipe is. You can add herbs such as rosemary, oregano, or thyme for an aromatic touch. Additionally, spices like paprika or garlic powder can enhance the flavor. For a cheesy kick, consider incorporating nutritional yeast or your favorite grated cheese into the mixture. Feel free to experiment with other ingredients to find your perfect flavor combination! How should I store Crispy Red Lentil Crackers? To keep your Crispy Red Lentil Crackers fresh and maintain their crunch, store them in an airtight container at room temperature. If they lose their crispiness over time, don’t worry! You can reheat them in the oven for a few minutes to bring back that delightful crunch. Proper storage will ensure you can enjoy these tasty snacks for several days, making them a perfect option for meal prep or snacking. Conclusion for Crispy Red Lentil Crackers Crispy Red Lentil Crackers are a fantastic way to enjoy healthy snacking without sacrificing flavor or crunch. They are easy to prepare with a few simple ingredients and allow for endless customization to suit your taste. Whether you enjoy them
Delicious Moroccan Kefta Briouat Recipe for Perfect Appetizers

Moroccan Kefta Briouat is an incredible dish that combines savory ground meat, aromatic spices, and flaky pastry into a delightful bite-sized treat. Imagine a crispy shell giving way to a warm, spiced filling, an explosion of flavor that dances on your taste buds while enticing aromas waft through the air. This delicious Moroccan Kefta Briouat is perfect for any occasion, whether you’re having a casual family dinner, hosting a festive gathering, or simply treating yourself to something special. Trust me, you’ll be counting down the minutes until these golden-brown pastries are ready to be devoured! Ingredients for Moroccan Kefta Briouat Here’s what you’ll need to make this delicious Moroccan Kefta Briouat: 0.5 kilogram ground meat – Use a blend of beef and lamb for a richer flavor, or substitute with minced turkey for a leaner option. 1 medium onion, finely chopped – Adds sweetness and depth to the filling, enhancing the overall flavor profile. 1 teaspoon paprika – This spice provides a warm, smoky taste, balancing the other spices in the mix. 1 teaspoon cumin – Adds a distinct earthy aroma, synonymous with Moroccan cuisine, marrying well with the meat. 1 teaspoon pepper – For that little kick that tickles the tongue in every bite. 1.5 teaspoons salt – Essential for bringing all flavors to life and enhancing the meat. 1 teaspoon cinnamon – This unexpected twist gives a sweet counterbalance to the savory filling, typical of Moroccan flavors. 8 tablespoons butter, divided – Provides richness to the dish and helps create a delicious flaky texture in the pastry. Handful fresh parsley leaves, chopped – Fresh parsley adds a pop of color and fresh flavor that lightens up this hearty dish. 3 large eggs, lightly beaten – Binds the filling together while also contributing to the overall richness. 1.1 pound warqa, filo dough, or large spring roll wrappers – Choose your preferred pastry; warqa is traditional but filo dough works perfectly too. 1 egg yolk, lightly beaten – Used for sealing each briouat, ensuring that all that amazing flavor stays inside while baking. Oil, for frying – Essential for achieving that crispy, golden-brown exterior that makes these bites so delightful. How to Make Moroccan Kefta Briouat Follow these simple steps to prepare this delicious Moroccan Kefta Briouat: Step 1: Prepare the Filling In a mixing bowl, combine the ground meat, finely chopped onion, paprika, cumin, pepper, salt, cinnamon, chopped parsley, and the lightly beaten eggs. Mix everything thoroughly until well combined, ensuring that all those tasty flavors meld together perfectly. Step 2: Assemble the Briouat Take a sheet of warqa or filo dough and place a generous spoonful of the meat mixture at one end. Fold the sides over and roll the dough to form a neat pastry pocket, sealing the edges with the beaten egg yolk. Make sure to repeat this process until all the filling has been used, laying the completed briouats on a tray. Step 3: Heat the Oil In a large frying pan, heat oil over medium heat. You’ll want enough oil to fully submerge the briouats, adding that irresistible crunch we all love. Step 4: Fry the Briouats Carefully place the briouats in batches into the hot oil, frying until they are golden brown and cooked through. This should take about 3-4 minutes per side, depending on the heat. Use a slotted spoon to flip them gently to ensure an even brown crust all around. Step 5: Drain and Serve Once browned, remove the briouats and let them drain on paper towels to soak up any excess oil. This little step makes a big difference in achieving that perfect crispy texture. Step 6: Enjoy! Transfer the briouats to a platter and serve them hot, garnished with additional chopped parsley if desired. These delightful bites are perfect as appetizers, party snacks, or even a scrumptious meal paired with a side salad. Cooking Moroccan Kefta Briouat is more than just making a dish; it’s about creating joyful moments and sharing delectable bites with friends and family. So, roll up your sleeves, gather your ingredients, and prepare for a culinary journey that will transport you straight to the bustling markets of Morocco! Perfecting Moroccan Kefta Briouat Cooking Process Start by mixing the meat and spices first to ensure even flavor throughout. While your mixture rests, prepare the dough sheets. Fry batches of briouat carefully to achieve that golden, crispy exterior and keep the oil at a consistent temperature for perfectly cooked pastries. Add Your Touch to Moroccan Kefta Briouat Feel free to swap out the ground meat with minced chicken or a plant-based alternative for a lighter twist. You can also experiment with different spices like harissa or add chopped nuts for extra crunch. Customize by including different herbs like mint for a fresh flavor profile. Storing & Reheating Moroccan Kefta Briouat Store leftovers in an airtight container in the refrigerator for up to three days. To reheat, bake in the oven at 350°F (175°C) until heated through, ensuring they stay crisp outside and tender inside without the sogginess from microwave reheating. The first time I made Moroccan Kefta Briouat, my friends couldn’t stop raving about them. They ended up devouring an entire platter in no time, turning our casual dinner into a celebration of flavors and laughter. FAQs About Moroccan Kefta Briouat What is Moroccan Kefta Briouat? Moroccan Kefta Briouat is a delightful pastry filled with a savory mixture of ground meat, aromatic spices, onions, and fresh herbs. Originating from Morocco, these treats are often made with warqa or filo dough, giving them a crispy exterior. They can be served as delicious appetizers or snacks, perfect for parties or gatherings. Each bite bursts with flavor, making Moroccan Kefta Briouat a favorite among food lovers. They not only offer a taste of Moroccan cuisine but also showcase the rich culinary traditions of the region. What ingredients are needed to make Moroccan Kefta Briouat? To prepare Moroccan Kefta Briouat, you will need ground meat (typically beef or lamb),
Irresistible Cheesy Pepperoni Dip Perfect for Your Valentine’s Day Thali

Indulge in the delightful flavors of the Irresistible Cheesy Pepperoni Dip for Your Valentine’s Day Thali. Just imagine that creamy, gooey center bubbling away in the oven, ready to be devoured alongside warm, crusty baguette slices! This dip isn’t just a treat; it’s a love story in a dish that creates a cozy ambiance for any gathering, elevating your snack game to irresistible heights. Picture this: a gathering of your favorite people, laughter echoing in the air, while the aroma of melted cheese wafts through the room. This dip promises to be the life of the party, perfect for cozy date nights, game days, or any occasion that calls for a little indulgence. Trust me; once you serve this cheesy delight, it’ll be the talk of the evening, and everyone will be asking for the recipe! Ingredients for Irresistible Cheesy Pepperoni Dip for Your Valentine’s Day Thali Here’s what you’ll need to make this delicious Irresistible Cheesy Pepperoni Dip for Your Valentine’s Day Thali: 8 oz cream cheese – Make sure it’s softened to mix easily into the dip, creating that irresistible creamy texture. 1/2 cup sour cream – Adds a delightful tang that balances the richness of the cream cheese wonderfully. 1 clove garlic – Grated for a punch of flavor; feel free to use more if you want to enhance that garlicky goodness. 3/4 tsp dried oregano – Gives the dip a fragrant, herbal note reminiscent of pizza night. 1 pinch red pepper flakes – Adds a gentle kick. Adjust the amount to suit your spice preference! 1/2 tsp kosher salt – Enhances all the flavors, making the dip irresistibly savory. 6 oz mozzarella cheese – Coarsely grated for maximum meltiness, this cheese is key for that gooey texture. 1/2 cup grated Parmesan – Provides a deliciously nutty flavor contrasting with the milder cheeses. 1/4 cup pizza sauce or marinara sauce – Choose your favorite brand or make your own to bring that authentic pizza essence. 2 oz mini pepperoni slices – Because pepperoni is the star here; these little circles pack a lot of flavor! 1 baguette – Warmed and sliced for dipping. Feel free to use crackers or veggies as alternatives! How to Make Irresistible Cheesy Pepperoni Dip for Your Valentine’s Day Thali Follow these simple steps to prepare this delicious Irresistible Cheesy Pepperoni Dip for Your Valentine’s Day Thali: Step 1: Preheat the Oven Preheat your oven to 375°F (190°C). This is the crucial step that ensures the dip gets nice and bubbly while you prepare the other ingredients. Step 2: Mix the Base In a large mixing bowl, combine the softened cream cheese, sour cream, grated garlic, dried oregano, red pepper flakes, and kosher salt. Use a hand mixer or a spatula to mix everything until smooth and creamy. Step 3: Add the Cheeses Gently fold in 4 oz of the coarsely grated mozzarella cheese and 1/4 cup of the grated Parmesan cheese until fully combined. This cheesy blend will create that delicious gooey texture we all love! Step 4: Incorporate the Sauces Next, add in the pizza sauce along with the mini pepperoni slices. Fold everything together until the pepperoni and sauce are evenly distributed throughout the cheesy mixture. Step 5: Transfer and Top Now it’s time to transfer the mixture to a greased baking dish. Spread it out evenly, then generously sprinkle the remaining mozzarella and Parmesan on top for that glorious cheese pull we’re all dreaming of. Step 6: Bake and Serve Place the dish in the preheated oven and bake for about 15-20 minutes, or until the dip is bubbly and golden on top. Once it’s out of the oven, let it cool for a couple of minutes, then serve it warm with sliced baguette or your favorite dipping options. Enjoy the cheesy goodness! This Irresistible Cheesy Pepperoni Dip for Your Valentine’s Day Thali is sure to steal hearts and create memories around the table. So gather your loved ones, pour a glass of wine, and dip away! This showstopping Irresistible Cheesy Pepperoni Dip for Your Valentine’s Day Thali delivers restaurant-quality results using simple ingredients you probably already have at home. The perfect balance of textures and flavors creates an unforgettable dining experience that will have everyone asking for seconds. Picture-perfect presentation with vibrant colors makes this dish absolutely Instagram-worthy and guaranteed to impress any dinner guest. Incredibly versatile recipe that works beautifully for weeknight dinners, meal prep, special occasions, or even outdoor entertaining sessions. Perfecting Irresistible Cheesy Pepperoni Dip for Your Valentine’s Day Thali Cooking Process Start by preheating your oven to about 350°F while mixing the cream cheese and sour cream. This ensures your dip gets hot and bubbly in no time. As you combine the ingredients, prepare your baking dish so everything is ready to go right in. Add Your Touch to Irresistible Cheesy Pepperoni Dip for Your Valentine’s Day Thali Feel free to swap mozzarella with your favorite cheese like cheddar for a bolder flavor. Throw in some chopped jalapeños for extra spice or swap the mini pepperoni for crumbled sausage if you’re feeling adventurous. Storing & Reheating Irresistible Cheesy Pepperoni Dip for Your Valentine’s Day Thali Store any leftovers in an airtight container in the fridge for up to three days. When reheating, pop it in the oven at 350°F until warmed through to maintain its creamy texture and delicious flavors. I remember the first time I made this dip for a family gathering. Everyone devoured it within minutes, and my grandma asked for the recipe, which made me feel like a true culinary wizard. FAQs About Irresistible Cheesy Pepperoni Dip for Your Valentine’s Day Thali What is Irresistible Cheesy Pepperoni Dip for Your Valentine’s Day Thali? Irresistible Cheesy Pepperoni Dip for Your Valentine’s Day Thali is a delectable appetizer combining creamy cheese, savory pepperoni, and flavorful herbs. This dish is perfect for gatherings, making it a crowd-pleaser at any celebration. Its rich, savory taste and gooey, bubbly texture create a memorable experience, ensuring
Garlic Parmesan Roasted Cauliflower: Easy Oven Recipe for Flavor

When it comes to delicious vegetable dishes, Garlic Parmesan Roasted Cauliflower stands tall and proud. Each floret crisps up in the oven to create a tantalizing combination of smoky garlic and rich, savory Parmesan that will have you going back for seconds. Imagine the warmth of freshly roasted garlic wafting through your kitchen—it’s basically like a hug from your favorite chef. This dish holds a special spot in my heart, as it often graces our family gatherings. I can picture my cousin valiantly trying to convince his daughters to eat their veggies with promises of “magic” powers fueled by this fantastic recipe. Spoiler alert: it works. Whether paired with a succulent steak, served alongside a cozy bowl of soup, or simply enjoyed as a flavorful snack, Garlic Parmesan Roasted Cauliflower is truly a versatile delight. Ingredients for Garlic Parmesan Roasted Cauliflower Here’s what you’ll need to make this delicious Garlic Parmesan Roasted Cauliflower: 1 head cauliflower – Choose a firm, white head without brown spots for the best results. 1/4 cup grated Parmesan – Opt for freshly grated Parmesan if possible; it brings a richer flavor compared to pre-grated varieties. 1/2 tsp garlic powder – This adds a warm, aromatic flavor that complements the cauliflower beautifully. 1/4 tsp salt – Essential for enhancing all the flavors in the dish. 1/4 tsp freshly cracked black pepper – Adds a touch of spice and depth to the overall flavor profile. 2 Tbsp olive oil – Use high-quality extra virgin olive oil for the best flavor. 1 Tbsp chopped parsley – An optional garnish that adds a pop of color and freshness before serving. How to Make Garlic Parmesan Roasted Cauliflower Follow these simple steps to prepare this delicious Garlic Parmesan Roasted Cauliflower: Step 1: Preheat Your Oven Begin by preheating your oven to 400°F (200°C). This temperature is magical for roasting vegetables, allowing them to caramelize beautifully. Step 2: Prepare the Cauliflower Rinse the cauliflower head under cold water. Shake off the excess water and cut it into bite-sized florets. Aim for uniform pieces so that they roast evenly. Step 3: Mix the Garlic Parmesan Seasoning In a small bowl, combine the grated Parmesan, garlic powder, salt, and freshly cracked black pepper. This magical mixture will transform your cauliflower into something truly special. Step 4: Coat the Cauliflower In a large mixing bowl, place the cauliflower florets. Drizzle the olive oil over them, ensuring that each piece gets a nice coating. Sprinkle the cheesy garlic mixture on top and toss everything together until every floret is well-coated. Step 5: Roast the Cauliflower Spread the seasoned cauliflower florets in a single layer on a baking sheet lined with parchment paper. Make sure there’s space between each piece for ventilation. Pop the baking sheet into the preheated oven and roast for about 30 minutes, stirring halfway through to ensure even cooking. Step 6: Serve and Enjoy! Once the cauliflower is beautifully caramelized, remove it from the oven. If desired, season with extra salt and pepper to taste, and sprinkle the chopped parsley on top just before serving. Transfer to plates and prepare to enjoy every scrumptious bite. Garlic Parmesan Roasted Cauliflower isn’t just a side dish; it’s an experience. Each bite is filled with cheesy goodness, a robust garlic flavor, and a satisfying texture that simply can’t be paralleled. This dish is a testament to the fact that eating your veggies can be downright delicious. One of my favorite ways to enjoy this dish is with friends gathered around the table, swapping stories and savoring crisp, roasted florets. Trust me, give this recipe a try the next time you’re looking for an easy, satisfying dish that will impress everyone at your dinner table. Happy cooking! Perfecting Garlic Parmesan Roasted Cauliflower Cooking Process Start by preheating your oven to 400ºF while you prepare the cauliflower. Next, wash and chop the cauliflower into bite-sized florets. Then, mix the Parmesan and spices in a bowl before combining everything together with olive oil for a flavorful coating. Add Your Touch to Garlic Parmesan Roasted Cauliflower Feel free to customize this dish with different cheeses like cheddar or feta for a unique twist. You can also add your favorite herbs, like thyme or rosemary, or even toss in some roasted nuts for added crunch and flavor. Storing & Reheating Garlic Parmesan Roasted Cauliflower Store any leftovers in an airtight container in the refrigerator for up to three days. To reheat, spread the cauliflower on a baking sheet and warm it in the oven at 350ºF until heated through to maintain its crispiness. Creating this Garlic Parmesan Roasted Cauliflower was a hit at our family reunion, and everyone begged for the recipe. My aunt even claimed it could convert any veggie-hater into an enthusiastic cauliflower fan—the power of cheese, my friends! FAQs About Garlic Parmesan Roasted Cauliflower What is Garlic Parmesan Roasted Cauliflower? Garlic Parmesan Roasted Cauliflower is a delightful side dish that features bite-sized cauliflower florets coated in a mixture of olive oil, Parmesan cheese, garlic powder, salt, and pepper. When roasted in the oven, the cauliflower becomes tender with a crispy, golden exterior, creating a blend of flavors that is sure to please any palate. This dish is a perfect side for various meals or can be enjoyed on its own, making it a versatile addition to your cooking repertoire. How do I make Garlic Parmesan Roasted Cauliflower crispy? To achieve that coveted crispy texture in Garlic Parmesan Roasted Cauliflower, start by ensuring that the cauliflower florets are evenly spaced on the baking sheet. This allows heat to circulate around each piece. Roasting at a high temperature, like 400ºF, also helps caramelize the edges for that delightful crunch. Don’t forget to toss the florets halfway through cooking to ensure even roasting and prevent steaming! Can I customize Garlic Parmesan Roasted Cauliflower? Absolutely! Garlic Parmesan Roasted Cauliflower is incredibly versatile. You can experiment with different seasonings and cheeses to suit your taste. Try adding herbs like thyme or
Delicious Fiery Rotel Cream Cheese Sausage Bites Recipe

The delightful combination of flavors and textures in Fiery Rotel Cream Cheese Sausage Bites is nothing short of sensational. Picture creamy, tangy cream cheese melding with zesty Rotel tomatoes, all wrapped around savory sausage and melted cheese. This dish promises an explosion of flavor that will make your taste buds sing and dancing at the dinner table. These little bites are perfect for sharing at gatherings, game days, or even a cozy night in with friends. With every heavenly morsel, you’ll find yourself delighted and craving more. What’s better? They are incredibly easy to whip up, ensuring that the only challenge you face will be stopping at just one bite. Ingredients for Fiery Rotel Cream Cheese Sausage Bites Here’s what you’ll need to make this delicious Fiery Rotel Cream Cheese Sausage Bites: 1 8 ounce cream cheese – Softened for easy mixing; full-fat cream cheese is recommended for creaminess. 1 pound breakfast sausage – Look for a spicy or mild version based on your heat preference; it adds savory depth. 1.5 cups Bisquick – A versatile baking mix that brings binding and thickness to our bites while adding a slightly crunchy texture. 1 10 ounce can Rotel tomatoes with green chilies – Drained to avoid excess moisture; these provide zesty flavor and a little kick. 2 cups shredded Mexican blend cheese – Offers a rich, cheesy flavor that complements the other ingredients beautifully. How to Make Fiery Rotel Cream Cheese Sausage Bites Follow these simple steps to prepare this delicious Fiery Rotel Cream Cheese Sausage Bites: Step 1: Preheat the Oven Begin by preheating your oven to 375°F (190°C). This step is crucial for achieving that lovely golden-brown finish on your bites. Step 2: Mix the Meats In a large mixing bowl, combine the softened cream cheese with the breakfast sausage. Use a sturdy spatula or your hands to mix until well blended. This is the time to get a little messy, so embrace it! Step 3: Add the Good Stuff Stir in the Bisquick, drained Rotel tomatoes, and shredded Mexican blend cheese. The mixture should become sticky and cohesive – make sure everything is evenly mixed so every bite is packed with flavor! Step 4: Shape the Bites With clean hands, roll the mixture into bite-sized balls, roughly the size of a golf ball. Place them on a baking sheet lined with parchment paper to keep them from sticking. Step 5: Bake to Perfection Bake the bites in the preheated oven for about 15 minutes or until they are golden brown and slightly crispy on the outside. Your kitchen will soon be filled with a mouthwatering aroma that captures the essence of the dish. Step 6: Serve and Enjoy Once baked, carefully transfer the bites to a serving platter. They are delicious warm and are sure to impress everyone you serve them to. Feel free to pair them with your favorite dipping sauce for extra flavor! These Fiery Rotel Cream Cheese Sausage Bites are a true crowd-pleaser. Whether it’s a party, game day event, or just a cozy night in, these little gems will bring culinary delight to any occasion. Enjoy every scrumptious bite! Perfecting Fiery Rotel Cream Cheese Sausage Bites Cooking Process To achieve the best results, first, preheat your oven and soften the cream cheese. Next, mix the sausage and cheese together thoroughly before adding in the other ingredients, ensuring even flavor distribution. Add Your Touch to Fiery Rotel Cream Cheese Sausage Bites Feel free to swap out the breakfast sausage for turkey or vegetarian sausage. You can also add spices like cumin or garlic powder for an extra kick, or try different cheese blends for unique flavors. Storing & Reheating Fiery Rotel Cream Cheese Sausage Bites Store any leftovers in an airtight container in the refrigerator for up to three days. Reheat in the oven or microwave until warmed through to preserve that delicious, melty texture. The first time I made Fiery Rotel Cream Cheese Sausage Bites for a game night, my friends were practically wrestling each other for the last bite. They couldn’t get enough! FAQs About Fiery Rotel Cream Cheese Sausage Bites What is Fiery Rotel Cream Cheese Sausage Bites? Fiery Rotel Cream Cheese Sausage Bites are a delicious appetizer that combines savory breakfast sausage, creamy cheese, zesty Rotel tomatoes with green chilies, and a bit of Bisquick for texture. These bite-sized treats are baked until golden brown, offering a perfect balance of flavors and a delightful crunch. They’re perfect for parties, game nights, or as a tasty snack. With just a handful of ingredients, these bites are simple to prepare and sure to impress your guests. How do I make my Fiery Rotel Cream Cheese Sausage Bites extra spicy? To kick up the heat in your Fiery Rotel Cream Cheese Sausage Bites, consider adding more diced green chilies or jalapeños into the mixture. You could also incorporate additional spices like cayenne pepper or smoked paprika. If you’re feeling adventurous, try mixing in some hot sauce or swapping out the Mexican blend cheese for pepper jack cheese to really turn up the temperature. Just remember, a little goes a long way! Can I freeze my Fiery Rotel Cream Cheese Sausage Bites? Absolutely! If you want to make your Fiery Rotel Cream Cheese Sausage Bites ahead of time, you can freeze them before baking. Once the bite-sized balls are shaped, place them on a baking sheet to freeze individually. After they’re solid, transfer them to a freezer-safe bag or container. When you’re ready to enjoy them, bake directly from frozen, adding a few extra minutes to the cooking time. What can I serve with Fiery Rotel Cream Cheese Sausage Bites? These bites pair wonderfully with a variety of dipping sauces. Consider serving them with ranch dressing, guacamole, or a zesty salsa to complement the flavors. For a fun twist, try a spicy chipotle mayo or classic buffalo sauce. You can also serve them alongside fresh veggies or a crisp salad to balance out the
Delicious Bread Machine Italian Herb Bread Recipe Made Easy for All
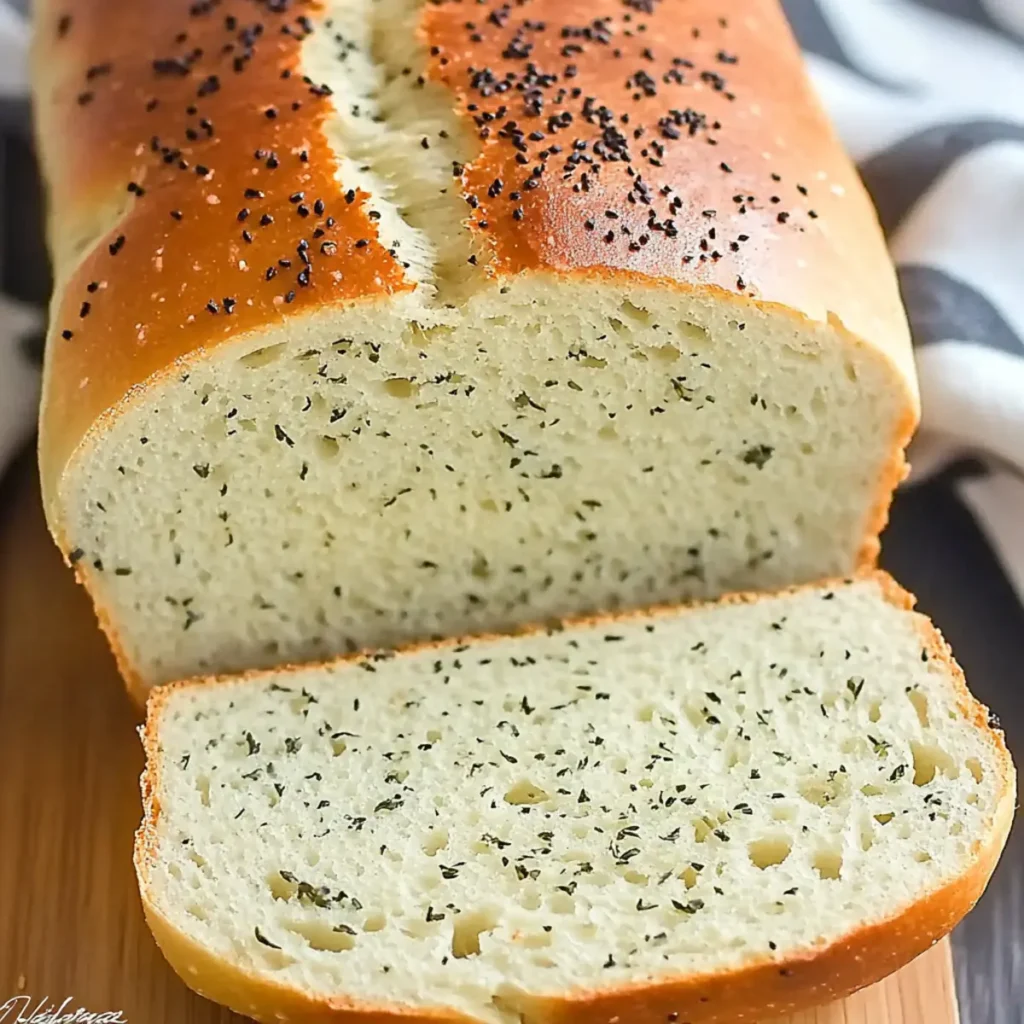
There’s nothing quite like the aroma of freshly baked bread wafting through your home, right? Imagine sinking your teeth into a warm slice of Italian herb bread, with its golden crust and soft, flavorful interior, giving comfort and joy with every bite. You can easily recreate this sensation at home with the delicious Bread Machine Italian Herb Bread Recipe made easy, where scrumptious flavors meet minimal effort. Picture this: a cozy evening, the table set, and family gathered around, anticipating the warm bread that will accompany the meal. It’s the kind of simple pleasure that makes you feel like a rockstar in the kitchen. With a few basic ingredients and a bread machine making things even simpler, you’ll have a loaf that’s not just tasty but a delight to share during family dinners, holiday gatherings, or any meal that deserves a little extra flair. Ingredients for Delicious Bread Machine Italian Herb Bread Recipe Made Easy Here’s what you’ll need to make this delicious Delicious Bread Machine Italian Herb Bread Recipe Made Easy: 1 1/3 cups water – The foundation of the dough; use warm water to activate the yeast properly. 1/3 cup Extra Virgin Olive Oil – Adds moisture and rich flavor; feel free to substitute with another oil if needed. 4 cups all-purpose flour – The main ingredient for structure; ensure it’s fresh for the best results. 3 tablespoons sugar – Enhances browning and gives a slight sweetness; it can be reduced if you prefer a less sweet loaf. 2 teaspoons salt – Balances the flavor and strengthens the dough; don’t skip this for optimal taste. 4 teaspoons dried Italian seasoning – Infuses the bread with those delectable Italian flavors; consider using fresh herbs for a more vibrant taste. 1 packet active dry yeast (1/4 oz.) – The magical ingredient that helps the dough rise; store it in the fridge for longevity. How to Make Delicious Bread Machine Italian Herb Bread Recipe Made Easy Follow these simple steps to prepare this delicious Delicious Bread Machine Italian Herb Bread Recipe Made Easy: Step 1: Gather Your Ingredients Begin by assembling all your ingredients. Make sure everything is measured out and ready to go. There’s nothing like the satisfying feeling of an organized kitchen as you embark on your baking adventure! Step 2: Add the Water and Olive Oil Pour the warm water and olive oil into the bread pan of your machine. This moist base is crucial for a light and fluffy loaf, so don’t rush this step. Step 3: Mix the Dry Ingredients Carefully add the flour, sugar, salt, and Italian seasoning into the bread pan—but let’s keep the yeast out of this mix for now. Think of this as the cozy flour blend ready to meet its yeast partner shortly! Step 4: Create a Yeast Nest Using your finger, create a small depression in the flour mixture and sprinkle the active dry yeast into this little nest. This separation helps the yeast activate properly without prematurely foaming. Step 5: Start the Bread Machine Select the basic setting on your bread machine. It’s as easy as pushing a button, and the machine will take care of the hard work. Now, all you need to do is wait—and maybe do a little happy dance while it mixes and kneads! Step 6: Let It Bake Once the machine signals that your bread is done, remove it carefully (it’s hot, of course!). Allow it to cool slightly, then slice away and serve it warm. It’s the perfect accompaniment to soups, salads, or just slathered with butter! When you bake this delicious bread machine Italian herb bread recipe made easy, you’re not only making a loaf; you’re baking memories. Every time I make this bread, I hear the laughter of family members sharing stories around the dinner table. The delightful crunch of the crust gives way to that soft, aromatic center, making it irresistible. So, go on, gather those ingredients, and whip up some magic in your kitchen! You won’t regret it. This showstopping Delicious Bread Machine Italian Herb Bread Recipe Made Easy delivers restaurant-quality results using simple ingredients you probably already have at home. The perfect balance of textures and flavors creates an unforgettable dining experience that will have everyone asking for seconds. Picture-perfect presentation with vibrant colors makes this dish absolutely Instagram-worthy and guaranteed to impress any dinner guest. Incredibly versatile recipe that works beautifully for weeknight dinners, meal prep, special occasions, or even outdoor entertaining sessions. Perfecting Delicious Bread Machine Italian Herb Bread Recipe Made Easy Cooking Process To achieve the best results with your bread machine, always add the wet ingredients first, followed by dry ingredients, reserving yeast until the rest is combined. This ensures a smooth rise and even baking. Add Your Touch to Delicious Bread Machine Italian Herb Bread Recipe Made Easy Get creative by swapping out the Italian herbs for your favorites, like fresh rosemary or thyme. You can also add in olives, sun-dried tomatoes, or cheese for extra flavor. Storing & Reheating Delicious Bread Machine Italian Herb Bread Recipe Made Easy To keep your bread fresh, store it in an airtight container at room temperature for up to three days. Reheat slices in the oven or a toaster for that just-baked crunch. After baking this bread for a family gathering, my cousin declared it “the best bread ever.” Watching everyone devour a loaf like it was the last slice of heaven really warmed my heart. FAQs About Delicious Bread Machine Italian Herb Bread Recipe Made Easy What is Delicious Bread Machine Italian Herb Bread Recipe Made Easy? The Delicious Bread Machine Italian Herb Bread Recipe Made Easy is a straightforward yet flavorful recipe designed for bread machines. Combining simple ingredients like water, flour, and Italian herbs, this recipe delivers a beautifully risen, aromatic loaf that embodies the spirit of Italian cooking. Each slice offers a delightful taste experience, perfect for pairing with meals or enjoying alone. Moreover, it’s incredibly convenient, allowing you to savor
Delicious Valentine’s Day Charcuterie Board Recipe for Lovers

Imagine a plate overflowing with colorful fruits, creamy cheeses, and an array of delightful treats—this is what a Valentine’s Day Charcuterie Board is all about. With its balance of savory and sweet, this board is not just a feast for the eyes; it’s a journey for your taste buds that can set the mood for love. Picture gathering around this gorgeous spread with your favorite person, indulging in each bite while stealing glances filled with affection. It’s perfect for Valentine’s Day or any romantic date night, offering flavors and textures that pique curiosity and spark conversation. So, get ready for this dreamy culinary adventure that promises not just food but an experience! Ingredients for Valentine’s Day Charcuterie Board Here’s what you’ll need to make this delicious Valentine’s Day Charcuterie Board: 8 ounces goat cheese – This creamy cheese adds a tangy flavor that pairs beautifully with sweet and savory elements. Use fresh and smooth goat cheese for the best texture. ¼ cup fig preserves or marmalade – A sweet spread that brings an irresistible contrast to savory meats and cheeses. Marmalade can add a citrusy zest if you’d like. ¼ cup pecans – These nuts provide a crunchy texture and a slightly sweet flavor, enhancing the overall mix. Toasted pecans work wonders for added flavor. 2.5 ounces dried cranberries – Their chewiness and sweetness lift the board’s flavor profile while providing a pop of color. Opt for no-sugar-added varieties for a healthier twist. 2 ounces roasted pistachios – These green gems add a delightful crunch and nutty taste, perfect for snacking. Remove the shells in advance for easy enjoyment. 3 ounces prosciutto – Thinly sliced, this savory cured meat adds richness and saltiness, balancing the sweetness of the fruits and jams. Look for high-quality, fresh slices for the best taste. 2.5 ounces spicy Italian dry salami – This salami packs a punch with its spices, providing a nice contrast with the other mild flavors. Choose a brand you love for guaranteed satisfaction. 8 ounces strawberries – Fresh, juicy strawberries lend a vibrant appearance and a sweet, refreshing bite. Pick firm and bright red berries for optimal flavor. 6 ounces raspberries – Tiny but mighty, these berries are tart yet sweet, adding a burst of flavor and another splash of color. Go for organic if possible for top-notch taste. 2.5 ounces radishes – Sliced thin, radishes add a crisp texture and a bit of peppery zing to the board. Choose firm radishes for the best crunch. 4 ounces sweet Gherkin pickles – Their sweet and sour touch creates a perfect complement to salty meats and crunchy nuts. Look for mini-sized for easy snacking. 4 ounces assorted crackers – These provide a delicious vessel for lifting the cheeses and spread, adding a varied crunch. Choose a mix of flavors for fun! 2.5 ounces chocolate covered pretzels – The ultimate sweet treat that adds both texture and delightful indulgence at the end of your tasting adventure. Choose your favorite chocolate to personalize your board. How to Make Valentine’s Day Charcuterie Board Follow these simple steps to prepare this delicious Valentine’s Day Charcuterie Board: Step 1: Gather Your Board Select a large wooden cutting board or serving platter that can accommodate all your delicious ingredients. Clean it well and have fun with the presentation! Step 2: Arrange the Cheese and Spreads Start by placing the goat cheese in the center of the board. Add the fig preserves or marmalade in a small bowl next to the cheese for a pretty pop of color. Scatter the pecans around them for added texture. Step 3: Lay Down Meats Next, add the prosciutto and spicy Italian salami. You can either lay them out flat or roll them up for a bit of flair. Arrange them artistically to entice those taste buds. Step 4: Add Fruits and Vegetables Now it’s time for the berries and radishes. Create small, colorful clusters throughout the board for visual appeal, making sure to balance colors and textures. Step 5: Include Fun Snacks Scatter the sweet Gherkin pickles and assorted crackers on the board, filling in any gaps. This makes it look abundant and inviting. Step 6: Finish with Chocolate Pretzels For the grand finale, sprinkle the chocolate covered pretzels across the board, adding a sweet touch that is bound to leave your guests swooning. Once you’ve arranged all your delicious goodies to your heart’s content, step back and admire your work! This Valentine’s Day Charcuterie Board not only tastes divine but also serves as a delightful centerpiece for your romantic evening. You might find it hard to resist diving right in! This showstopping Valentine’s Day Charcuterie Board delivers restaurant-quality results using simple ingredients you probably already have at home. The perfect balance of textures and flavors creates an unforgettable dining experience that will have everyone asking for seconds. Picture-perfect presentation with vibrant colors makes this dish absolutely Instagram-worthy and guaranteed to impress any dinner guest. Incredibly versatile recipe that works beautifully for weeknight dinners, meal prep, special occasions, or even outdoor entertaining sessions. Perfecting Valentine’s Day Charcuterie Board Cooking Process Begin by arranging the goat cheese and fig preserves on the board; this will serve as a delightful centerpiece. While adding the other ingredients, keep an eye on balancing salty and sweet elements for maximum flavor impact. Add Your Touch to Valentine’s Day Charcuterie Board Feel free to swap out the goat cheese for cream cheese or add a variety of nuts and fruits based on your preferences. Experiment with different meats like salami or turkey for unique flavor blends. Storing & Reheating Valentine’s Day Charcuterie Board Cover any leftover portions with plastic wrap or store them in airtight containers in the fridge. When ready to enjoy again, simply assemble the fresh ingredients without reheating to maintain their vibrant flavors. Sharing this delightful board with my friends last year brought back smiles and laughter as we devoured everything—my partner couldn’t stop raving about the chocolate-covered pretzels! FAQs About Valentine’s Day Charcuterie