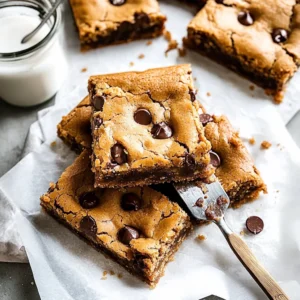

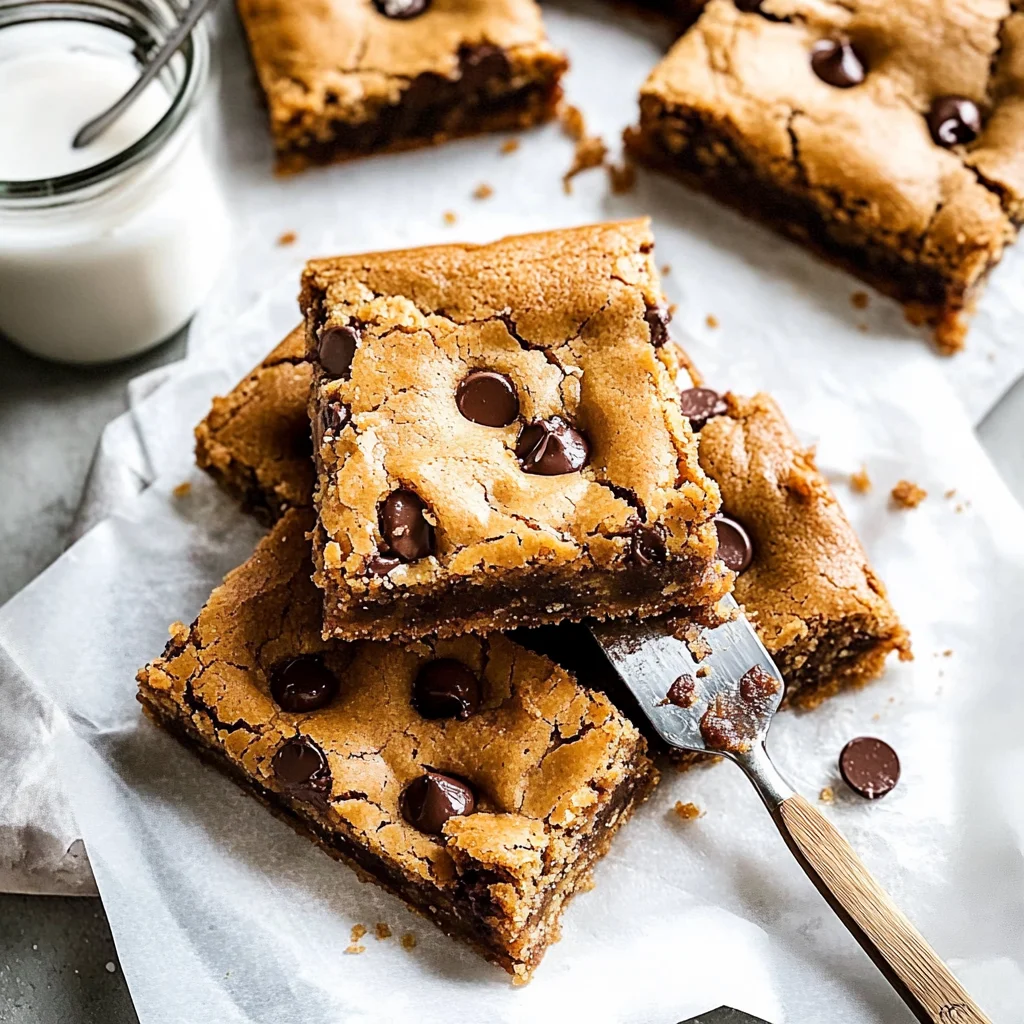
Imagine sinking your teeth into a warm, gooey cookie bar, where rich chocolate melts in your mouth and crunchy nuts add that perfect texture. The aroma wafts through the air, promising a delightful sweetness that’s impossible to resist, making any moment feel like a celebration.
These cookie bars are not just snacks; they’re an experience that evokes childhood memories of baking with loved ones or cozy afternoons spent indulging in sweet treats. Ideal for gatherings or a simple pick-me-up during a hectic day, each bite delivers a wave of joy that will leave you craving more.
Why Is cookie bars So Irresistibly Good?
Rich and buttery flavor from the softened unsalted butter makes every bite melt in your mouth. Sweetness balanced perfectly with brown sugar and granulated sugar creates a delightful treat. Chewy texture comes from the combination of flour and eggs, ensuring these bars are satisfying. Versatile add-ins, like chocolate chips and nuts, allow you to customize them to your taste. Plus, they’re ready in just 40 minutes—perfect for a last-minute dessert or snack!
cookie bars Ingredients
- For the Batter
- 1 cup unsalted butter (softened) – Use room temperature butter for a creamy texture that helps the cookie bars spread evenly.
- 1 cup brown sugar (packed) – This adds moisture and a rich flavor to your cookie bars.
- 1/2 cup granulated sugar – Balances the sweetness and gives your cookie bars a delightful crunch.
- 2 large eggs – Eggs help bind the ingredients together, creating a chewy texture in every bite.
- 1 teaspoon vanilla extract – Enhances the overall flavor, making these cookie bars taste irresistible.
- 2 cups all-purpose flour – Provides the necessary structure for your cookie bars to hold their shape.
- 1 teaspoon baking soda – Helps the cookie bars rise and become fluffy as they bake.
- 1/2 teaspoon salt – Balances sweetness and enhances flavors in your delicious cookie bars.
- Add-ins
- 1 cup chocolate chips (semi-sweet) – These melt beautifully, creating gooey pockets of chocolate in every bar.
- 1/2 cup chopped nuts (optional) – Adds a delightful crunch and nutty flavor, complementing the sweetness of the chocolate chips.
How to Make cookie bars

1. Preheat the oven to 350°F (175°C) and grease a baking dish. This creates the perfect environment for your cookie bars to bake evenly and develop that delightful golden edge.
2. Cream together the softened unsalted butter, packed brown sugar, and granulated sugar in a mixing bowl until smooth. This step is crucial for incorporating air into the batter, giving your bars a lovely chewy texture.
3. Beat in the two large eggs one at a time, then stir in the teaspoon of vanilla extract. This addition fills your kitchen with warmth and sweetness, setting the stage for deliciousness.
4. Whisk together the two cups of all-purpose flour, one teaspoon of baking soda, and half a teaspoon of salt in another bowl. These dry ingredients will provide structure to your cookie bars while balancing out the sweetness.
5. Combine by gradually adding the dry mixture to the wet ingredients, mixing until just combined. Be careful not to overmix; you want those cookie bars to stay tender!
6. Fold in the one cup of semi-sweet chocolate chips and chopped nuts if you’re using them. Each bite will be a delightful surprise of chocolatey goodness paired with crunchy texture.
7. Spread the batter evenly in your prepared baking dish. Ensure it’s smooth on top so that it bakes evenly, resulting in perfectly cut bars later.
8. Bake in the preheated oven for 20-25 minutes, or until the edges are golden brown and a toothpick inserted into the center comes out clean. Keep an eye on them as they bake; you want that perfect balance of chewy and soft!
9. Cool in the baking dish before cutting into bars. This resting time allows them to set beautifully, making it easier to achieve those perfect squares.
Optional: Enjoy these cookie bars warm with a scoop of vanilla ice cream!
Exact quantities are listed in the recipe card below.
Tips for the Best cookie bars
- Butter Temperature: Use softened butter, not melted, to ensure your cookie bars have the right chewy texture.
- Sugar Packing: Pack the brown sugar tightly in the measuring cup; this adds moisture and depth of flavor to your cookie bars.
- Egg Room Temperature: Bring eggs to room temperature before mixing; this helps them blend evenly into the batter for a smoother texture.
- Mix Gently: When combining wet and dry ingredients, mix just until incorporated. Overmixing can lead to tough cookie bars.
- Watch the Bake Time: Keep an eye on your cookie bars in the oven; they should be golden around the edges but still soft in the center when done.
- Cooling Patience: Allow the bars to cool completely in the dish before cutting. This ensures they hold their shape and don’t crumble.
How to Store and Freeze cookie bars
- Room Temperature: Keep your cookie bars in an airtight container for up to 3 days to maintain their chewy texture and flavor.
- Fridge: For longer freshness, store cookie bars in the refrigerator for up to 1 week. Just ensure they’re covered to avoid drying out.
- Freezer: Wrap individual bars tightly in plastic wrap, then place them in a freezer-safe bag. They’ll stay fresh for up to 3 months!
- Reheating: To enjoy warm cookie bars again, microwave for about 10-15 seconds or until warmed through. Perfect for a cozy treat!
cookie bars Your Way
Feel free to unleash your creativity with these chewy delights and make them uniquely yours!
- Nut-Free: Omit the nuts for a classic treat or substitute with more chocolate chips for an extra indulgence. This way, you keep the focus on that rich, gooey chocolate in every bite.
- Gluten-Free: Swap all-purpose flour for a gluten-free blend to accommodate dietary needs. Just make sure to choose a high-quality blend that includes xanthan gum for the best texture in your cookie bars.
- Vegan: Replace butter with coconut oil or vegan butter, eggs with flax eggs (1 tablespoon flaxseed meal + 2.5 tablespoons water per egg), and use dairy-free chocolate chips. These tweaks create a deliciously chewy, plant-based version that’s just as satisfying.
- Spiced Up: Add 1 teaspoon of cinnamon or a pinch of nutmeg to the dry ingredients for a warm, cozy flavor twist. The spices will enhance the sweetness and give your cookie bars a delightful depth that’s perfect for chilly nights.
- Extra Crunchy: Mix in 1/2 cup of rolled oats along with your chocolate chips. This addition gives your bars a hearty texture and makes them even more filling—perfect as an afternoon snack!
- Coconut Lover’s: Incorporate 1/2 cup of shredded coconut into the batter for a tropical flair. Each bite will transport you to sandy beaches, making these cookie bars even more irresistible.
- Heat It Up: Add 1/4 teaspoon cayenne pepper or chili powder for a surprisingly delightful kick. The subtle heat perfectly complements the sweetness of the chocolate and adds an exciting twist to your classic treat!
Make Ahead Options

Making these cookie bars is a delightful experience, and they’re perfect for meal prep! You can prepare the base ingredients like the softened unsalted butter, packed brown sugar, and granulated sugar ahead of time. In fact, you can mix everything up to the point of baking and store the batter in the fridge for up to 24 hours. Just remember to preheat your oven to 350°F (175°C) before you’re ready to bake. If you prefer, you can also go ahead and bake them in advance; they’ll stay fresh at room temperature for about 3 days. For optimal quality, store them in an airtight container. When you’re ready to serve, simply cut them into bars after they’ve cooled in the baking dish. Enjoy your deliciously chewy cookie bars whenever you please!
Your cookie bars Questions, Answered
What type of butter should I use for the cookie bars?
Using unsalted butter is ideal for this recipe. It allows you to control the saltiness of your cookie bars better. Make sure it’s softened to room temperature for easy creaming with the sugars, which helps create that delightful chewy texture!
Can I substitute brown sugar with something else?
While brown sugar adds moisture and a lovely caramel flavor to your cookie bars, you can substitute it with granulated sugar if needed. Just keep in mind that your bars may turn out a bit less chewy and flavorful. For an even closer match, consider using coconut sugar or a blend of brown and white sugars.
How long do these cookie bars stay fresh?
These delicious cookie bars can be stored in an airtight container at room temperature for up to 4 days. If you want them to last longer, consider refrigerating them, which can extend their freshness by about 3-5 additional days.
Can I freeze the cookie bars?
Absolutely! Allow the cookie bars to cool completely before wrapping them tightly in plastic wrap or aluminum foil, then place them in a freezer-safe bag. They can be frozen for up to 3 months. When you’re ready to indulge, simply thaw them at room temperature or warm them briefly in the microwave.
What if my batter is too dry or crumbly?
If your batter seems dry, it could be due to measuring too much flour. Ensure you’re spooning and leveling the flour rather than scooping directly from the bag. You can add a splash of milk or an extra egg if needed to bring it together without compromising texture.
How many servings does this recipe make?
This recipe yields about 4 generous servings, perfect for sharing with family or enjoying as a quick afternoon snack! If you’re hosting or baking for a crowd, feel free to double the recipe and bake it in a larger dish for even more tasty treats!
Cookie Bars
Ingredients
Method
- Preheat the oven to 350°F (175°C) and grease a baking dish.
- In a mixing bowl, cream together the softened butter, brown sugar, and granulated sugar until smooth.
- Beat in the eggs one at a time, then stir in the vanilla extract.
- In another bowl, whisk together the flour, baking soda, and salt.
- Gradually add the dry ingredients to the wet mixture, mixing until just combined.
- Fold in the chocolate chips and nuts if using.
- Spread the batter evenly in the prepared baking dish.
- Bake in the preheated oven for 20-25 minutes, or until the edges are golden and a toothpick inserted in the center comes out clean.
- Allow to cool in the baking dish before cutting into bars.