
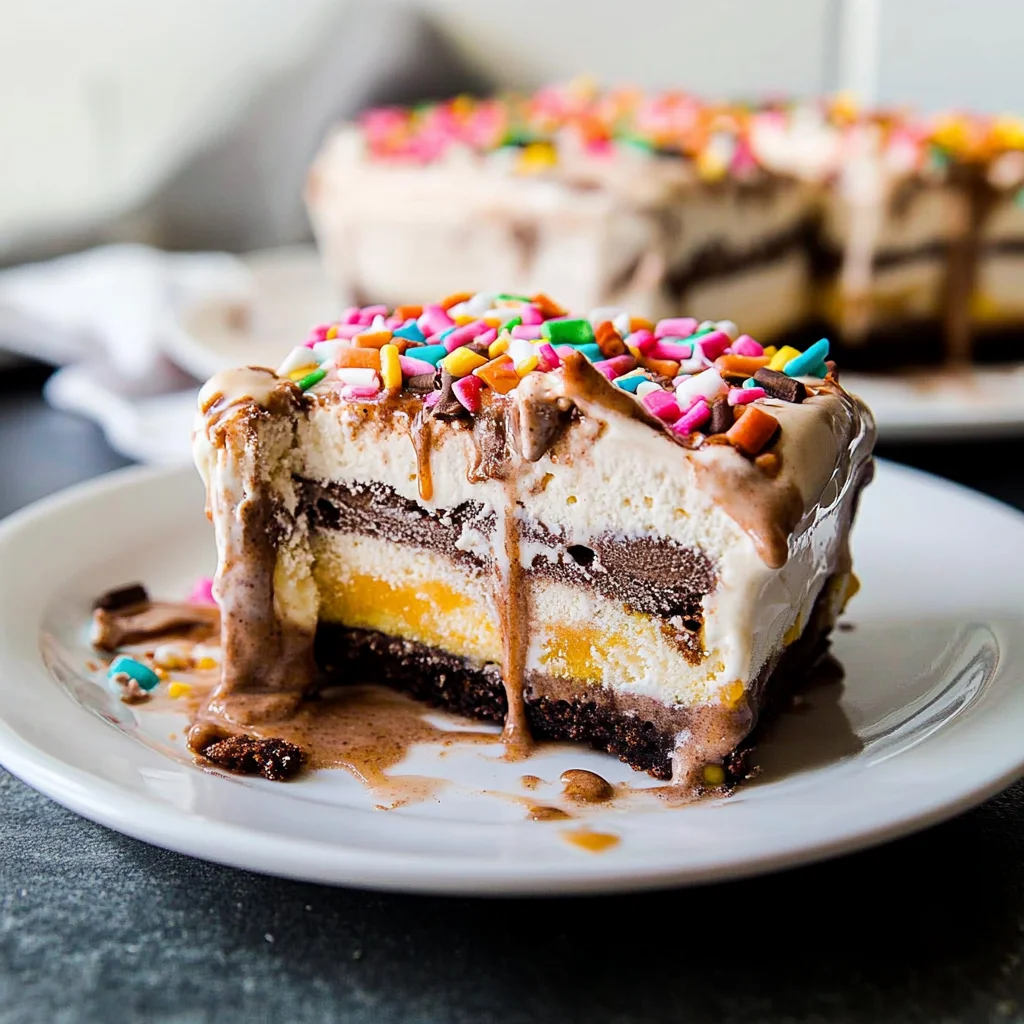
Imagine sinking your spoon into a luscious slice of DIY ice cream cake, where creamy layers of rich ice cream meld perfectly with moist cake, creating a symphony of flavors that dances on your taste buds. The aroma wafts through the air, teasing your senses and beckoning you to indulge, while the delightful crunch of cookie crumbles adds an exciting texture that keeps every bite interesting.
This delightful treat isn’t just about satisfying your sweet tooth; it’s woven into the fabric of celebrations—birthdays, graduations, or even a spontaneous summer gathering. I still remember the joy on my friend’s face when I surprised her with a homemade ice cream cake, sparking laughter and memories that lingered long after the last bite. Get ready to experience an extraordinary flavor journey that will leave everyone asking for seconds!
Why Is diy ice cream cake So Irresistibly Good?
Indulge in the perfect combination of flavors and textures! This easy-to-make dessert features layers of moist cake, creamy ice cream, and fluffy whipped cream that everyone will love. Customize it with your favorite ice cream flavors to suit any celebration. Plus, with just 30 minutes of prep time, it’s a fun and quick treat that saves you time while impressing your guests!
diy ice cream cake Ingredients
For the Cake Layer
- 1 box chocolate cake mix – You can also use your favorite flavor for a personal touch.
- 1 cup water – Use as directed on the cake mix instructions for best results.
- 1/3 cup vegetable oil – This adds moisture; don’t skip it!
- 3 large eggs – Make sure they’re at room temperature for a fluffier cake.
For the Ice Cream Layers
- 2 pints ice cream – Choose any flavors you love; this is where creativity shines!
For the Frosting
- 1 cup whipped cream – Perfect for topping and adding a light, airy finish.
- 1/4 cup chocolate syrup – Drizzle on top for an extra sweet treat with your diy ice cream cake.
How to Make diy ice cream cake

1. Preheat the oven according to the cake mix instructions. This ensures your cake bakes evenly and comes out fluffy and delicious.
2. Combine in a mixing bowl the chocolate cake mix, 1 cup of water, 1/3 cup vegetable oil, and 3 large eggs. Mix until smooth—this should be a lovely chocolate batter.
3. Pour the batter into a greased 9-inch round cake pan, ensuring it’s evenly spread. This helps create a uniform layer of cake for your delightful dessert.
4. Bake according to package instructions. Once done, let it cool completely on a wire rack until it’s ready to assemble.
Assemble the Cake:
5. Slice the cooled cake in half horizontally to create two layers. This step is crucial for layering your ice cream beautifully!
6. Place one layer of the cake in the bottom of the cake pan and spread a generous layer of your chosen ice cream on top. Choose any flavor you love!
7. Add the second layer of cake on top of the ice cream, followed by another layer of ice cream to make it irresistibly creamy and rich.
8. Cover the assembled cake with plastic wrap and freeze for at least 2 hours to set perfectly, ensuring each bite is refreshing.
Finish and Serve:
9. Remove the cake from the freezer and gently take it out of the pan, revealing those beautiful layers you’ve created.
10. Frost the top with 1 cup of whipped cream and drizzle with 1/4 cup of chocolate syrup for that extra touch of sweetness.
11. Slice and serve immediately, watching those delightful layers come together with every cut!
Optional: Garnish with sprinkles or fresh fruit for a colorful touch.
Exact quantities are listed in the recipe card below.
Expert Tips
- Cake Cooling Time: Allow the cake to cool completely before slicing; a warm cake can melt the ice cream layers, creating a messy dessert.
- Layering Ice Cream: Use softened ice cream for easier spreading. Let it sit out for a few minutes before layering on your diy ice cream cake.
- Consistent Layers: For even layers, use a kitchen scale to measure the amount of ice cream and cake batter. This ensures every slice is balanced and delicious!
- Frosting Finish: Whipped cream can be tricky; ensure it’s well-whipped but not over-beaten. Overbeating will cause it to turn grainy.
- Freezing Time Matters: Don’t rush the freezing process! A minimum of 2 hours is essential to solidify your layers and maintain structure when slicing.
How to Store and Freeze diy ice cream cake
- Fridge: Keep your diy ice cream cake in the fridge for up to 3 days. Cover it with plastic wrap or a cake dome to maintain freshness.
- Freezer: For longer storage, freeze the cake for up to 2 weeks. Wrap it tightly in plastic wrap and then in aluminum foil to prevent freezer burn.
- Thawing: When ready to enjoy, thaw the diy ice cream cake in the fridge for about 2 hours before serving for the best texture.
- Leftover Ice Cream: If you have leftover ice cream, store it in an airtight container in the freezer for up to 1 month.
diy ice cream cake Your Way
Feel free to unleash your creativity with these delightful twists that elevate your homemade treat!
- Gluten-Free: Substitute the chocolate cake mix with a gluten-free blend, ensuring everyone can enjoy a slice. The flavor remains rich and satisfying, perfect for any gathering.
- Vegan: Use a plant-based cake mix and substitute eggs with flaxseed meal or applesauce. This option offers a moist texture while accommodating diverse dietary needs.
- Fruit-Infused: Add a layer of fresh fruit, like strawberries or raspberries, between the ice cream layers for a refreshing burst of flavor. The sweetness of the fruit will complement the creaminess beautifully.
- Nutty Crunch: Fold in chopped nuts or crushed cookies into the ice cream before layering. This adds a delightful crunch that contrasts wonderfully with the smooth texture of the ice cream.
- Coffee Lover’s Dream: Mix in instant coffee granules into the cake batter for a subtle coffee flavor. It pairs perfectly with chocolate or vanilla ice cream for a sophisticated touch.
- Layered Chocolate Delight: Use chocolate fudge sauce between layers instead of just drizzling on top. This creates an indulgent experience that chocolate lovers will adore.
- Savory Twist: Try adding a hint of sea salt to the whipped cream topping for an unexpected flavor contrast. The salt enhances sweetness and elevates every bite.
Make Ahead Options

Preparing a diy ice cream cake is not only a treat but also a fantastic way to streamline your meal prep for celebrations. You can easily prepare the cake layer in advance by mixing together 1 box of chocolate cake mix, 1 cup of water, 1/3 cup of vegetable oil, and 3 large eggs. Once baked and cooled (this can be done up to 24 hours ahead), slice the cake horizontally to create two layers. The ice cream layers can also be prepped in advance; simply choose your favorite flavors and store them in the freezer. Assemble the cake by placing one layer of cake in the pan, spreading ice cream on top, adding the second layer, then topping it off with more ice cream before freezing for at least 2 hours or overnight. When you’re ready to serve, simply frost with whipped cream, drizzle with chocolate syrup, and enjoy! This method not only saves time but ensures your diy ice cream cake is fresh and delicious when it’s time to celebrate.
diy ice cream cake Recipe FAQs
Can I use any flavor of cake mix for the diy ice cream cake?
Absolutely! While chocolate cake mix is a classic choice, feel free to experiment with your favorite flavors. Vanilla, red velvet, or even lemon cake mix can add a delightful twist to your ice cream cake.
How long should I freeze the diy ice cream cake before serving?
For best results, cover the assembled cake with plastic wrap and freeze it for at least 2 hours. This will give the layers enough time to set properly, making it easier to slice and serve. If you want a firmer texture, you can freeze it even longer!
What’s the best way to store leftover diy ice cream cake?
If you have leftovers (which is rare because it’s so delicious!), store them in an airtight container or wrap the pieces tightly in plastic wrap. It can stay in the freezer for up to a week, but for optimal taste and texture, try to enjoy it within 3-4 days.
Can I make this diy ice cream cake dairy-free?
Yes! You can easily customize your cake to be dairy-free by using dairy-free ice cream and an egg substitute in your cake mix. Look for plant-based whipped topping as a frosting alternative as well.
How many servings does this recipe yield?
This delightful diy ice cream cake serves about 4 people. If you’re hosting a larger gathering or simply want more slices to enjoy later, consider doubling the recipe and using two round pans!
What if my layers aren’t perfectly even when assembling?
Don’t worry; uneven layers are all part of the homemade charm! If one layer is taller than another, simply use a serrated knife to level it out before adding your ice cream. It’ll still taste amazing, and those imperfections might just add character!